How to create an instance on Amazon Web Services (AWS)
An Instance is a just a virtual computer deployed on cloud.


Step-1: Create an AWS account.
You can create a free-tier AWS account by going to their website.
The sign-up process is quite straightforward so I wont be going over it.
Step-2: Setting up a new instance.
Once you have created an AWS account, you will see the AWS Management Console. Now Click On services and find the EC2 option under the Compute sub-list.


Now click on launch instance under the create instance subheading.

Now choose your preferred operating system for your virtual machine. Since I am using a free-tier account, I will be using a free tier eligible OS.

Here, I will be using the Windows Server 2012 since it is one of the most popular OS for servers on the market.
Now you will be asked to select an instance type. This includes the number of vCPUs( virtual CPU), the amount of memory, storage type etc.
Again, since I am using a free-tier account, I am only eligible for t2.micro type.
After selecting your instance type, click on Configure Instance Details.

The Configure Instance Details window gives you a number of options to customize your instance.
If you just want a basic instance, you don't have to change any values and can proceed to the next step.

Now select the amount and type of storage you require. You can also attach additional EBS volumes after launching an instance.
Proceed to the next step.

The next step is to add a tag to your instance. This step is optional.

The next step is configure security group. A security group is a set of firewall rules that control the traffic for your instance. You can enter a custom IP to access your instance or set it to 0.0.0.0/0 to allow all IPs to access your instance. After setting this up, click on Review and Launch.

Now review you details and click on launch.

Now you will be asked to select a key pair. A key pair is a set of encrypted files that when combined, will give you the password to connect to your instance.
Select the Create a new key pair option and then give a name to your key pair. Now click on download key pair. After the download is complete, click on launch instance.

Congratulations ! you have successfully launched an instance.
Step -3: Connecting to your instance.
Now that you have successfully launched an instance, let us connect to it.
Click on services and then on EC2. Now you'll see that you have 1 Running Instance. Click on it.

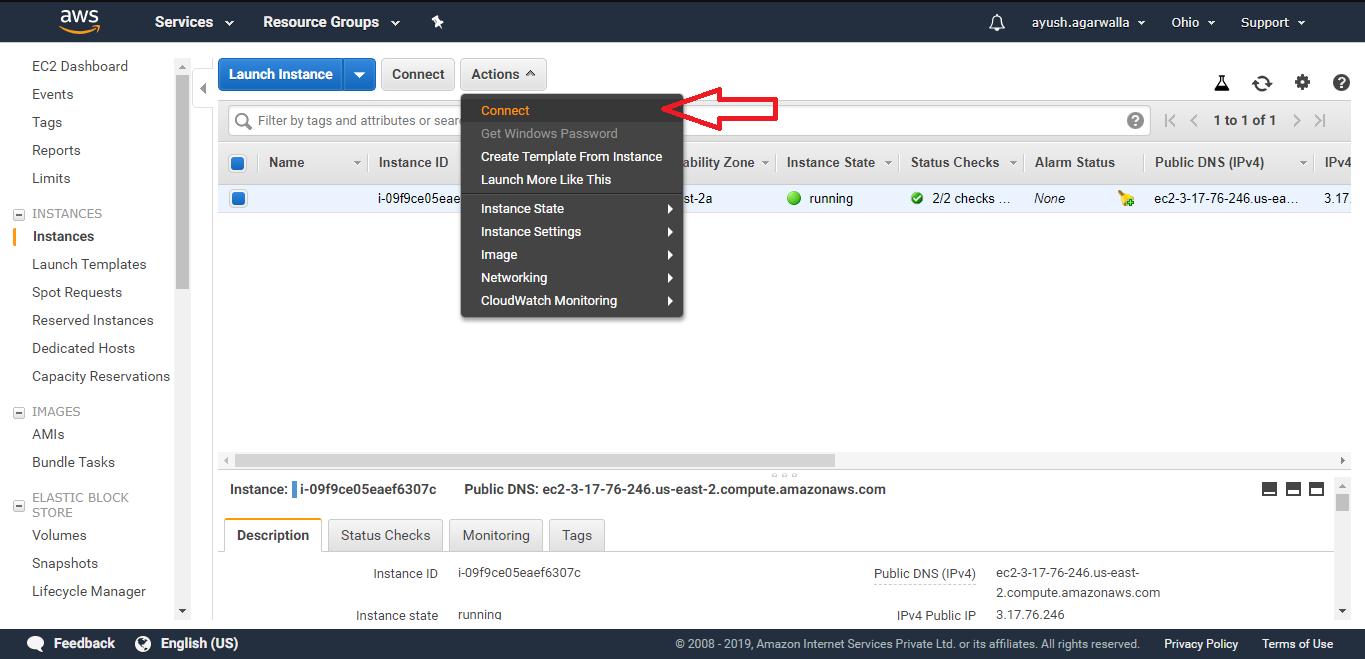
You'll see the following:

Now select your instance and then on Actions. Now click on connect.
Now click on Download Remote Desktop File. This file lets you connect to your instance.

Now click on Get Password. Now select the key pair file that you downloaded earlier and click on Decrypt Password.

Now copy the decrypted password.

Now open your Remote Desktop File that you downloaded earlier and click on connect.

Enter your password and click on OK.

Congratulations on connecting to your first instance !
If you are using a free tier account, don't forget to terminate your instance after you are done with it as leaving it running can cost you money.
Thanks For reading !
Comments
Post a Comment